Quantcast

Getting Estimates for Sprinkler System Installation-?’s to ask

What To Ask & Look For When Hiring a Contractor to
Install a Sprinkler System
In my years of installing sprinkler systems, I’ve seen a lot of what goes on in the landscape and lawn irrigation field. I hope to help homeowners make an informed decision when seeking estimates and know how to differentiate the good from the bad.
Every year I have several contractors beat my prices by a large margin.  A small margin is normal, but a large margin is cause for concern. Understand that there isn’t much room to move on prices unless that contractor is going to cut corners. […]


What To Ask & Look For When Hiring a Contractor to
Install a Sprinkler System

In my years of installing sprinkler systems, I’ve seen a lot of what goes on in the landscape and lawn irrigation field. I hope to help homeowners make an informed decision when seeking estimates and know how to differentiate the good from the bad.

Every year I have several contractors beat my prices by a large margin.  A small margin is normal, but a large margin is cause for concern. Understand that there isn’t much room to move on prices unless that contractor is going to cut corners. That being said, if you get several estimates that are in the same range and all your questions have been answered satisfactorily, but there is one estimate that is really high with no obvious reason, then it has probably been inflated.

Some possible red flags

  • It’s early in the season and their schedule is wide open
  • The bid is very low or very high
  • They promise an exact start date
    • Weather almost always affects start date
    • Some contractors will say they will get there sooner to get the job

This is what I provide with every estimate

  • I always provide a drawing to scale showing what the homeowner will get if they hire me.
  • This drawing has head placement, number of zones, and location of  the lateral lines and mainline
  • I give written information on the products I’m using
  • I assure the homeowner that they will have head to head coverage
  • for smart and effective watering with no brown spots
  • I have, and honor, a 1 year warranty on labor, 3 years on parts
  • Winterization the first year and next year’s turn on & check out are free
  • I install a professional sprinkler system with commercial grade parts.

Now I’m not going to be the least expensive in most cases, but over the years I’ve always made sure to do it right the first time and have happy customers. I never cut corners.  Now every irrigation contractor has made mistakes over the years (I have). The important thing is, does that contractor learn from their mistakes and honor their warranty?

Listed below are some questions to ask and things to look for when getting estimates and hiring a Lawn Sprinkler Contractor.  I hope this will help you in your search.

Questions To Ask When Getting an Estimate For a Sprinkler System

  1. A scale drawing showing head placement, zones and where everything will be.
  2. Will I have head to head coverage?
    1. This means that in most cases every sprinkler head will be hit by the water from another sprinkler head.
    2. Show me on the drawing.
  3. Where do you buy your parts?
  4. Are they commercial grade such as Rainbird, Hunter, Toro etc? (not parts from a hardware store or super store ie. Lowes.)
  5. What’s the name brand of the sprinkler parts?
  6. Ask for written information (specs) on the sprinkler parts
  7. Are you insured?
  8. How many years experience do you have?
  9. How long have you been in business?
  10. Do you have references?
  11. May I see some of your work?
  12. How deep will the sprinkler lines be?(They should be 6” to 12” deep)
  13. Do you have a Plumbing License?
  14. What equipment will be used?
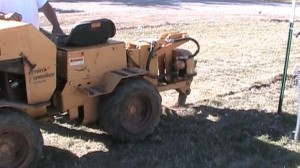
  15. If you have established grass, the sprinkler lines should be plowed in with a vibratory plow,
      1. This will cause much less damage to the yard.
      2. If a trencher is used the trenches will have to be compacted and sodded
      3. When a vibratory plow is used, you usually can’t tell that the yard was even disturbed within a week
  16. What kind of warranty will I get?

Other Things to Remember

  • Presents himself in a professional manner
  • Answers your questions
  • Get three estimates and compare prices
  • Compare contractors with prices.
  • How effective is their presentation.
  • Remember the saying ‘You get what you pay for’

I hope this will help you find a good Irrigation contractor so that you will have a stress free experience with your project and end up with a problem free system. Good Luck.

How Easy is it to Install a Sprinkler System?

Control Weeds with a Strong Weed Barrier (Landscape Fabric)

Control Weeds with a Strong Weed Barrier (Landscape Fabric)
Over the years I have seen several types of weed barrier (landscape fabric) fail and when they fail it’s quite a job to fix the problem.  First you begin to see a lot of weeds and grasses coming up all over your landscape area, then you realize that the weed barrier has failed.  All of the mulch needs to be removed and new weed barrier needs to be installed.  This is costly and labor intensive.
If your landscaping project is old or new, use good quality weed barrier and install it the right […]


Control Weeds with a Strong Weed Barrier (Landscape Fabric)

Over the years I have seen several types of weed barrier (landscape fabric) fail and when they fail it’s quite a job to fix the problem.  First you begin to see a lot of weeds and grasses coming up all over your landscape area, then you realize that the weed barrier has failed.  All of the mulch needs to be removed and new weed barrier needs to be installed.  This is costly and labor intensive.

If your landscaping project is old or new, use good quality weed barrier and install it the right way.  I use Typar weed barrier 3oz spun bound polypropylene or Dewitt 4.1 woven needle punch polypropylene fabric.  I never use any weed barrier lighter than 3oz even though these companies make lighter fabric.  Most of the time you will only find this weed barrier at your local nurseries or online.  Avoid buying weed barrier at your local stores unless they are good quality, most of the time they are not.

Your landscaping fabric should meet the following requirements.

  • The weight – 3.0 oz
  • Tensile Strength – 135 lbs
  • Elongation Strength (%) > 70
  • Puncture Strength (lbs) 35
  • Thickness 15.0 mils
  • Permitivity (Sec – 1) 1.2
  • Typically black or charcoal in color.
  • Check the name brand.


When you install the weed barrier overlap the seams by 4” to 6”, lap the fabric up against your edging or structure, and use 6” U Staples to hold it down.  When placing the fabric around your plant material, cover around the bottom of the plant but don’t make it tight around the trunk.  (NOTE:) Never use plastic, the plants can’t breathe or get water around the root ball.

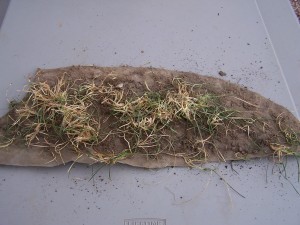
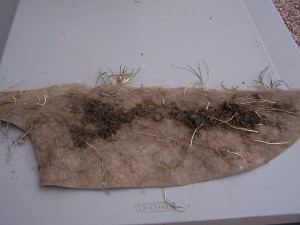
Below is a example of landscaping fabric that has failed.  Look at how the weeds have grown through the fabric.

Top


Underside

How easy is it to install a sprinkler system?

I’m sick of paying outrageous sprinkler repair bills!

See Also:Landscape Edging How To

Tips for Laying Sod

Tips for Laying Sod
Laying sod is the fastest way to get a lush green lawn. It is more expensive than seeding, but unless you are paying for hydroseeding, sod will be a lot easier to take care of than seeding. When you seed yourself, weeds have a chance to grow too, and the grass can take a couple of seasons to fill in completely.
When laying sod, it’s very important to do it right. It’s certainly not fun or cheap to redo it.
Preparation-A Good Foundation For Sod

Loosen the soil 4” to 6” deep, this helps the plant grow. If the soil […]


Tips for Laying Sod

Laying sod is the fastest way to get a lush green lawn. It is more expensive than seeding, but unless you are paying for hydroseeding, sod will be a lot easier to take care of than seeding. When you seed yourself, weeds have a chance to grow too, and the grass can take a couple of seasons to fill in completely.

When laying sod, it’s very important to do it right. It’s certainly not fun or cheap to redo it.

Preparation-A Good Foundation For Sod

  • Loosen the soil 4” to 6” deep, this helps the plant grow. If the soil is hard and compact the turf area will always need more care and water.
  • Make sure that there is 4” to 6” of good top soil with organic material.
  • If you have poor soil add top soil to it or till in yard waste compost that’s well composted.
  • When in doubt take a soil sample and send it to a laboratory and see how much sand, silt and clay that you have.  Too much of one or the other will give you a idea of what will need to be added.
  • Hint – Top Soil isn’t always black or rock free.
  • Rake everything out sloping away from the house making sure that water will drain out and away fast.

Mistakes to Avoid When Laying Sod

  • Not having the top soil prepared or having enough of it is one of the biggest mistakes people make.
  • Another mistake that’s made is not making sure that there is proper drainage away from the house and through the yard.

Laying the Sod

  • Stagger your seams, keeping the seems tight and lay your sod horizontal to your slope. This will prevent the water from following the seams down hill and not staying on the sod.
  • If your yard has a steep slope always start laying the sod at the bottom of the slope.  If you start at the top the sod will want to slide down as you lay it and this makes for a sodding disaster.

Watering Your Sod

  • Now that the sod is laid spread a good starter fertilizer and water immediately.  Depending on the time of year, water two to three times a day for a week, more if needed.
  • Back off watering the second and third week.
  • Check to see if the sod is rooting down by pulling up on a corner of the sod and look for white roots.  Most of the time it takes 4 to 6 days for this to cure.
  • If there is ever standing water or a lot of water is running  off the sod, back off the watering.
  • The third and fourth week you could water every other day.


The best time for sprinkler system installation is before you lay sod.

Check this link out

How easy is it to install a sprinkler system?

Timber Retaining Wall

We built this wall in the fall of 2010.  The existing wall that was there was leaning inward two feet because it was build with wire anchors (which had rusted through) and the joints were not over lapping.  With this wall we used 5x6x12’ long timbers with 5×6 Dead Men, 1/2” – 5/8” Rebar and 12” Spikes to hold the timbers together.
TOOLS.  The following tools will be needed.

Speed Square and Rafter Square
Pencil and 25’ Tape measure
At least a 2lb hammer
String Line and level,
4’ level
1/2” drill (NOTE: if you use a cordless drill to drill through the timbers, it will burn […]

We built this wall in the fall of 2010.  The existing wall that was there was leaning inward two feet because it was build with wire anchors (which had rusted through) and the joints were not over lapping.  With this wall we used 5x6x12’ long timbers with 5×6 Dead Men, 1/2” – 5/8” Rebar and 12” Spikes to hold the timbers together.

TOOLS.  The following tools will be needed.

  1. Speed Square and Rafter Square
  2. Pencil and 25’ Tape measure
  3. At least a 2lb hammer
  4. String Line andtools needed to build wood retaining wall level,
  5. 4’ level
  6. 1/2” drill (NOTE: if you use a cordless drill to drill through the timbers, it will burn up)
  7. 1/2” & 5/8” Rebar (NOTE: I use rebar because it’s less expensive than Spikes and also stronger; you will need a way to cut it.)
  8. Chainsaw
  9. Saws-all with a 12” wood blade
  10. Spud-bar, hand tamper (for compacting soil) and shovels.
  11. Wood auger drill bits (one size smaller than the spikes and rebar)
  12. Equipment (Depending on the size of the wall you may need a back hoe, Skidster, gas compactor, and a way to haul the excess soil away.)

Now you need to decide where you want the wall and mark it with marking paint or a string line.  Call in locations, so that the utility companies can mark the gas, electric and phone lines, this is very important before any digging is done. To get the number, call one of your utility companies and they should be able to provide it for you. Get an idea of where you would like to have the base of the wall, and excavate to that depth and dig down an extra 4” to 6” deeper for your compacted base.  I typically use a string line & level or a 4ft level to keep the base plumb.  After this is done you will have your grade.  Compact the soil at grade and apply your base course and compact it.  Make sure the base is compacted well enough to provide the wall with a good strong base.
Start out with your first row of timbers making sure it is level by adding or removing some of the base course.  Butt the timbers together, on turns notch the timbers so that they over lap by 6” to 8”.  Drill holes through the base timber every 5’ ft and at every joint, then hammer 1/2” or larger rebar 18” in length through down into the ground.  This will secure the base timber.  After the first layer of timbers are laid it will need to be buried 6” with topsoil on the facing side of the wall.  This helps with drainage and stability.

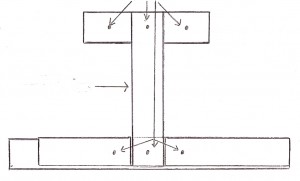
Dots are where the rebar is run through

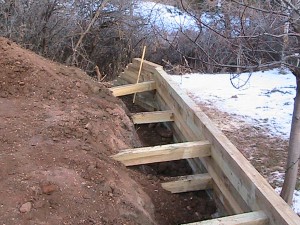
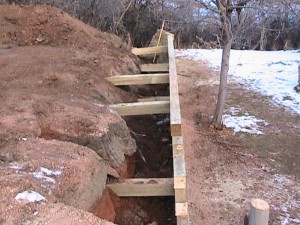
Now we stack the timbers on the timber base staggering the joints, drilling and nailing them together with rebar or spikes every 5ft, (Remember to nail each butt joint on each end).  Every time I stack the timbers they get set back from the face of the wall a 1/2” in. So that when the wall is finished it leans away from the face of the wall, In other words the wall isn’t straight up and down.  This gives the wall added strength.  This wall will be 4ft tall and we placed the first dead-man at the third row, then staggered them at different heights anywhere from 6’ to 8’.  On this wall there was a shallow gas line that I needed to go up and over with the timber base and I wasn’t able to place any dead-man in that area so I doubled up on dead-men in different areas.  Everywhere there is a dead-man at the face of the wall I will nail it to the timber below and the one placed above it also nailing the two timbers ends that butt up to it.  This makes the dead-man and the wWood Retaining Wall Deadmanall all connect together, so if the wall ever wants to move it has to take the dead-men with it.  On this wall some of these dead-men are dug back 6’Ft and some due to there location are 3’ back. I always try to dig the dead-men back at least 3’Ft so that there will be more compacted soil around the dead-men.  Notice in the picture that on the end of the dead-men I have placed a 3’Ft 5X6 under the timber that’s dug back, and tied it together with 1/2” rebar, driving it threw the timber and into the ground on the ends and in the middle.  All of the dead-men will Wood Retaining Wall Deadmanbe done the same way.


Compact the soil in 6” lifts to assure these areas will be firmly compacted.

Timber Wall Deadmen

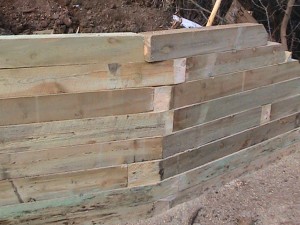
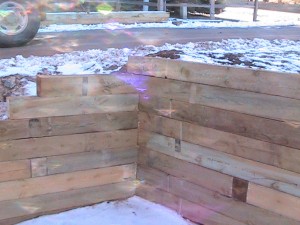
Overlapping joints wood retaining wallAs you can see in this picture, I have alternating and over lapping joints.  This will need to be done on outside and inside corners.  I also placed a dead-man in the middle of the conner (very important for every outside corner).  This is where I use the Sawsall with the 12” blade to trim the corner pieces flush with the wall.  The top Timber hasn’t been trimmed yet.


End of Timber Retaining Wall


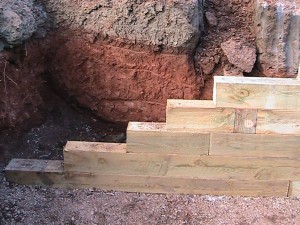
With this picture, I cut the top end pieces at a angle to dress up the end of the wall.


inside Corner on Timber Retaining Wall


Where the inside corner will go hasn’t been dug out yet, so we ended the wall this way until we could finish this inside corner.


inside Corner on Timber Retaining Wall


This picture shows the inside corner finished.  The timbers have alternating over lapping joints that are all nailed together.  This is the same as a outside corner except, I didn’t need to place a dead-men on a inside corner.


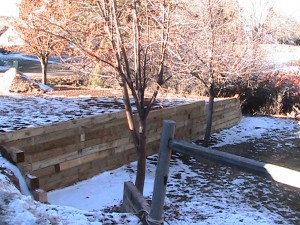
This seWood Timber Retaining Wallction of the wall is finished and the rest will be done spring of 2011


When backfilling the wall I always use 1” or 3/4” clean rock at least one foot behind the wall, then soil.  This rock is very important, it gives moister a way to escape and prevents the soil from pushing against the back side of the wall during the changing seasons.  Behind the wall I have shaped the soil so that the rain water will drain fast in to a natural drainage ditch in the back yard and not set behind the wall.  Sometimes we allow the rain water to drain over the wall fast, although in this case it would be best to drain it on the back side

How easy is it to install a sprinkler system?


Tired of paying outrageous sprinkler repair bills?