In the Spring, I always get calls about the various steps in the process of turning on a sprinkler system. In most areas, sprinkler systems get winterized in the fall. This means the water will be off and drained from your sprinkler system.
Below the Video there are written instructions and pictures.
If this post has helped you, please help us spread the word by clicking on the social plugins, liking us on facebook or leaving a comment. Thanks.Easy Sprinkler System Maintenance
Adjust Rainbird 1804 Spray Heads Video
Adjust Rainbird 5004 Rotor Heads Video
Written Instructions Below
In most areas, sprinkler systems get winterized in the fall. This means the water will be off and drained from your sprinkler system.
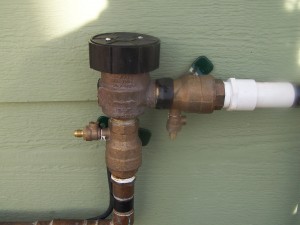
- To begin, find your backflow preventer. This is usually found on the outside of the house. It will typically have two ball valves and some pepcock valves.
- Using a screw driver, make sure the pepcock valves are closed. Close the ball valves, sometimes you will need channel lock pliers to do this.
- Now you’re ready to turn on the water to the sprinkler system. Always remember to fill your sprinkler lines slowly. The valve to turn on the water is usually near your water meter inside the house. Turn the valve handle slowly to fill the lines between there and the backflow preventer.
- Once the line is filled, go to the backflow preventer and open the lower ball valve. This is the one closest to the water source on the backflow preventer. This will close the check valve and supply water to the second ball valve on the backflow. Sometimes water will dump from the top or bottom of the backflow preventer. This is normal.
- Turn on the second ball valve 1/3 of a turn and fill your mainline. This is the line between your backflow and the irrigation valves. Remember to fill the line slowly to prevent a hammer on the mainline.
- One way to check and make sure your mainline is charged (full of water) is that you will no longer hear a hissing sound and the dial on the water meter will be still. (As long as no one in the house is using water.)
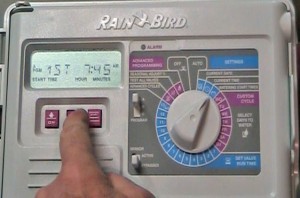
Programming your controller is next. All controllers have the same basic functions.
- Time and Current Date (Remember to look at the am and pm)
- Program Start Times (Most sprinkler systems run on one start time. If you have a drip zone this will need to run at different times than the turf zones)
- Station Run Time
- Advance Cycles (This is the days that it will run, Odd/Even, Custom or Cycle)
The most common mistakes made when programming the controller is having the current time off by twelve hours and having the program start times entered incorrectly. If your controller was plugged in all winter it may remember the settings, but it is best to check. If you have a battery installed, now would be a good time to replace it.
- Turn on each zone individually or in test mode and check your zones outside as they run. Always check for leaks.
- While each zone is running, check each sprinkler head, making sure it is operating and spraying correctly.
- Open all of the irrigation valve boxes and check for leaks while the irrigation system is running.
- I always tell my customers that rotor heads run for 20 to 30 Min, and spray heads run for 10 to 18 min. Also remember that the north side and shady parts of the yard may not need as much time to water and sunny areas may need more time. This will help your yard stay greener and save water.
Water shooting in the air, standing water, and bulges in the turf are all signs of a problem. If this happens, turn the water off to the system so that it doesn’t waste water until it is repaired. That should do it, I hope this helped and that you enjoy a long trouble-free season after turning on your sprinkler system.
Are you tired of paying for Sprinkler Maintenance & Repairs?
See Also:
Easy Sprinkler System Maintenance
Adjust Spray Heads Video
Adjust Rotor Heads Video
This video loads slow for some people. It is the same as the one at the top.


